We have made very little progress on Tevan's Cafe' build in the last 6 weeks or so. So we started tackling small things in our spare time.
I made Tevan sit down with a sharpie and start marking up his front brake rotor. After about 5-6 different designs, he settled on one he liked, so we took it to the computer to lay it out properly.
This pattern will make sure that the brake pads are fully swept across the holes. This pattern is more than just ornamental, and will look nice on his vintage style build.
We printed off the pattern, and seeing as how the pattern is larger than standard printer paper, we had to tape 4 sections together. Then we taped that pattern to the rotor.
In the drawing, I made sure all the holes had a center location, which we then used to locate and punch the hole centers into the rotor through the paper. Auto punches are NICE for this kind of work, seeing as how we have 100 or so holes to punch.
All punched out, and ready to drill..
Let the drilling commence! *it is worth noting, that these rotors are stainless, and hard as can be on your tooling. Get a supply of GOOD drill bits before attempting this, keep some oil on the bit, and slow down your drill press to the proper speed.
All drilled out, and ready to finish. We will be deburring all the holes, and surfacing the rotor in the next few days.
Hopefully we will make some more progress on the Resto-Mod Cafe' in the next few weeks. Stay tuned!
This frame was never meant to be... At least not from our hands. This frame came to me from a good customer who has been waiting over 6 months for a weld-on hardtail section from another supplier. Unfortunately, this feller was out his cash AND still didn't have a frame to put together. We don't do alot of frame sections here at HHB, but from time to time, we'll make it happen.
This is a great example of one of our tail sections. A subtle mix of 1" and 1.125" tubing, factory lower frame rails tweaked for nicer lines, and no oddball "plug" from the backbone to the lower frame rails.
There are many differences in one of our frame sections, when compared to some of the popular tail sections on the market. I get asked all the time "Will you offer a Weld-On Hardtail?" and the answer is constant. I will not supply a weld on tail, but I will gladly build one for you in my JIG, ensuring proper installation, and a straight riding motorcycle. Plus, then you can have any specs you desire and I can work my magic on the stock frame loop to make it more natural appearing rather than an "addition" to the stock frame.
This frame is 3" stretch, with 4" of ride height and should look great when finished. I know this one is getting a nice rephased engine, PMA swap, and some of our Shaved, Polished and Lowered forks... Can't wait to see it done!
As always folks, thanks soo much for your continued support and encouragement. I wouldn't change what I do for anything in the world when I see happy customers getting their bikes together like this.
Had some folks make the drive down to Asheville NC from Canada this past weekend... We had spoken several times on the phone and after several back and forth emails, these folks decided to make the drive to deliver their XS650 Engine for a rebuild/big bore/rephase...
They somehow managed to find the shop, it's not very well labeled (as of now, I have a friend from Shop 102 in Georgia making a sweet new sign for us). I scrambled over from the Christmas Parade with my wife and some other friends to meet them. They sent us these photos, and I thought I would share them with ya'll.
We do have our collective "The Hive" sign up, but that is all that lets you know what may or may not be behind that door...
The engine to be built, stacked next to a recently finished engine...
We hung out, chatted, and had a great time. These folks win the "Longest Drive to Hugh's HandBuilt" to date!
The coolest part about this whole thing, is not that I get to build another engine, or anything to do with me at all really. This is going to a Father and Son build. They both drove down together, spending time with each other, and enjoying the trip. We all headed over to Barley's Tap and Pizza, enjoyed a great lunch, shared stories, had a few local brews and then they were off. There was a whisper of Smoky Mountain Knifeworks, Cigars and Beer in Ohio, and a few other stops on their way home. I was slightly jealous.
It was a pleasure to meet them both, and I'm excited to be a small part of their build... Sometimes it is more about the experience and the journey than the final outcome. These folks reminded me of that, and it has made my week all the better...
So I needed to test run a new engine for a customer.. My old stand was clunky, heavy and fairly hard to use. So we scrapped it...
This new stand is fairly simple, just a furniture dolly, a regular XS650 engine stand, and a set of "handlebars" to hold all the miscellaneous wiring... I set it up with 2 Coils (required for testing rephased engines) a PMA regulator, and a Sparx capacitor. Along with a "On/Off" switch, I can now test fire an engine, and test the PMA system before shipping it out to customers.
And just a quick video for this particular customer.. You'll not that this engine is NOT even bolted to the stand, it just has a few lengths of metal rod holding it to the stand, hence the rattles and looseness... These carbs are only to fire up the engine and test it, and do not belong to this engine either... I just needed a set to fire up the bike, so I stole them from my Street Tracker Project... The pipes are stock headpipes that were laying in my pile...
This particular engine was just fired up about 2-3 minutes before taking this video. I will be breaking it in over the next few days, re-adjusting the valves and camchain, changing the oil and then sending it to it's new owner.
Well folks, engine building season is upon us - I have 6-7 engines lined up for new builds, so stay tuned, and get yours here FAST if you want on the list - Hugh
Taking a break to spend time with my family in Missouri until next Tuesday. We have an annual hunting trip up there every year.
We are hoping to give Roxxy (The Infamous Shop Dog) a few more "Chew Toys" this season! But until then, please be patient with us as I will not be answering emails/phone calls until next Tuesday at earliest...
I finally had some T-Shirts printed up for all those who have been begging for them. I had a very talented fellow down in Georgia create the design for these, and if you look closely, you'll recognize the images (Bike/Helmet/etc...) to be inspired by Hugh's HandBuilt's First Build.
Available in Black or Charcoal, and currently available in M, L, XL only (sorry folks, email me if you really want some in other sizes, and I'll try to get some made up).
Front (*Note - This is the Charcoal color)
Charcoal (Image is on back)
Black (Image is on Back)
Limited Quantity of Womens Teal Tanks available as well (*SOLD OUT )
As with ALL purchases from Hugh's HandBuilt - Free Shipping in the USA! (Email me at HughsHandBuilt@gmail.com for other shipping inquiries)
Doing a little bit of work on Tevan's Resto-Mod Cafe Project in the last few days in between customer work...
I've been showing Tevan how to bend and notch tubing, but it was finally time to let him try it out for himself... Armed with some 7/8" OD tubing, an angle finder and the bender, he managed to get the upper truss/brace bent up in one shot...
The notching took a while to make it all fit properly, but his patience has paid off... I think he may have practiced on about 4 feet of tubing before he was finally comfortable with his notches...
Careful consideration was given to proper chain clearance and shock clearance. We had to double/triple/quadruple check the frame clearances as we went...
The factory had some fairly gnarly looking welds, so we cleaned up what we could... Welding 40 year old material is always a challenge.
All in all, this should be a nice compliment to the rest of the bike, stay tuned as we design and build the seat and the tail section mounting...
This is a 1996 Buell S2 Thunderstorm. It has the 1203cc Sportster Engine, roughly 100 HP, and has the highly sought after Buell Heads. While the engine runs great and pulls strong, the body is a bit beat. The front fairing has had some repairs and is painted Flat Black. The rest of the body is typical for this model/age and has some cracks and paint chips/scuffs...
I'm trying to describe this bike properly, as to avoid 200 emails.. The front fork seals leak a bit. The Tires are in 75% shape or so. There are no leaks from the rear suspension at all. The bike handles solid, pulls wheelies, and runs like a top. It has about 37K on it... The Vance and Hines pipes in good shape. Yes, the Carbon Fiber air filter cover looks rough, because it is...
Otherwise, this is a solid riding and performing bike. I rode it more than any other this past year, and loved it... It would make a great chop, or just ride it as is... The tube frames are getting harder to find (Think steel head tube welded onto a chop frame - yeah!)
Just a few more shots for you folks...
And lastly... I am asking $1900 on this one... And yes, thats the price for the complete bike. You can hear this on run and ride it for the cost of what most people want just for the engine. I may do a little trading around, email me if you are interested... HughsHandBuilt@gmail.com
My friend over at Briton Bees built this moped, and apparently the stars aligned because it literally fell into my lap... A deal was struck, and I now own my first Moped... I'm not complaining...
I'm slowly learning the magic that happens inside a 2 stroke engine, but for now I'm gonna ride this thing until the snow flies!
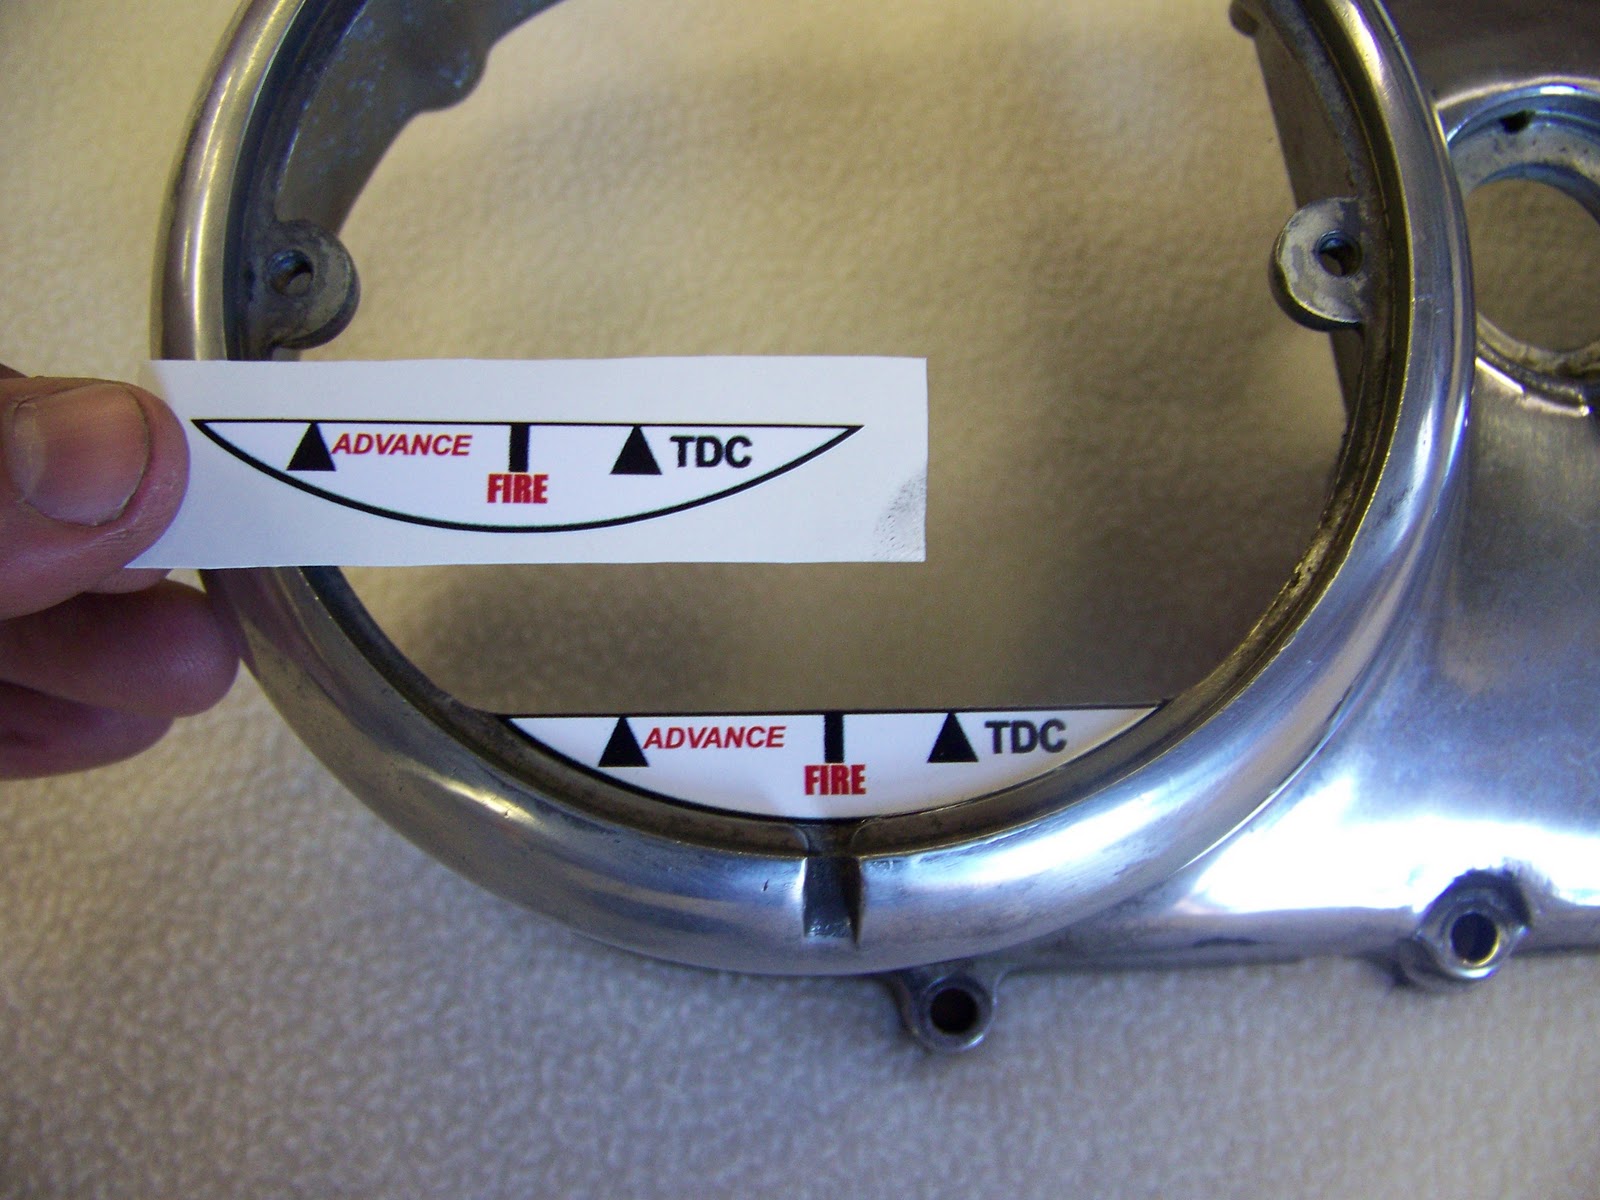
We offer a bolt-on PMA system that is the highest output on the market. Don't settle for lesser componentry to save a few bucks when you can have a 200 Watt High Output system from Hugh's HandBuilt. We were the first to offer a complete PMA kit for these machines, and we stand by our commitment to XS650 Enthusiasts with Tech Support, DIY articles and Top Notch Customer Service. We also offer the most complete PMA kit on the market. Complete with hardware, wiring, and now including a Timing Tab applique to apply to your side cover.
Looking for the most in-depth install article on the internet? Look no further because we wrote the book on XS650 PMA Swaps! - In depth PMA Swap on the Chop Cult!
I've had alot of request to assemble complete kits, to avoid confusion of buying wrong parts and paying shipping on 3-4 items. This is a Major Bonus to our customers who are having a hard time finding all the small parts for the swap. Plus, it is all new AND better than used OEM components. Higher output and better built. Now offering the COMPLETE swap kit. Currently available for $319.00 and shipped FREE in the US!!
A Complete PMA Kit will include:
NEW High Output Stator - "This is a NEW 200 Watt High Output Stator! This new stator is built with the highest grade lamination materials and the copper windings are triple insulated for maximum reliability. To ease installation we supply it with new connectors and wire sleeving."
NEW Flywheel - Full encased magnets provide a lifetime of trouble free operation. This Flywheel has 20% stronger magnets than an OEM Flywheel and will provide a higher output in low RPM operation. This works very well with our 200 Watt Stator.
NEW Stator Mounting Plate - Machined and ready to bolt in, no need to modify a used one (if you can find one of course)
NEW 3 Phase Regulator - 3 Wires in, 2 out (Battery + and -) Super simple wiring, will mount in the stock location as well.
NEW PMA Swap Kit - Same Kit I've been selling all along. See it at the top of the screen. Hardware included
TIMING TABS/STICKER! - This is a new addition to the full kit. The Complete PMA kit will now come with a stick on timing sticker. No more worrying about making timing marks on your side cover. Accurate and simple.
NEW Wiring Package - Gold plated terminals, New Plastic Terminal Connectors, and wiring sleeve keeps your install clean and proper.
*FREE Tech Support -All Hugh's HandBuilt products come with Free Tech Support via email/phone/forums/etc...
*There is never a charge for Tech Support even if you don't purchase from us - We are Enthusiasts Helping Other Enthusiast and that is just the way it is. NOW IN STOCK! No more waiting, these typically ship out in 2-3 days - Thanks for your support gang! Out of country and overseas shipping options are listed below.
I have finally acquired a Briton Bees moped! I would rarely buy a fully built custom bike from someone, but this thing is such a masterpiece I just had to have it!
This is a sneak peak, I'll get some better pics tomorrow. This was before it was completed.
Time to put some Harley parts to good use... And what better purpose than to use them as an organ donor for a really sweet Jap Bike build right? I know, I know - go ahead and hold off on the hate mail for just a few days....
So we have been plugging away at Tevan's Resto-Mod build, and decided we wanted to make a sweet cafe' style tail section for it. We thought about buying an off the shelf tail section, but thats not how we do things around here. We thought about laying some of our own fiberglass down, and I decided against that for no real reason other than I hate messing with fiberglass...
So we looked around the shop for some sheetmetal, and happened to remember we had a set of HD tanks sitting on the shelf that might be suitable to cut up... Sounds perfect!
The Donor Tanks:
We eyeballed what we thought would look like a nice shape for the tail section, drew out some lines with a market, and then gave ourselves a bit more room to shape afterwards...
Make some cuts...
Do some grinding, shaping, hammering and welding and you should end up with something like this:
Match up the left and right halves - I like to use my Eyecrometers for a job this tedious.... You'll notice we welded in a flat panel on the bottom of this section, as the stock HD tanks look like the surface of the moon for whatever reason...
You can also see that this tank had some kind of liner in it previously, we had to scrape/grind/chisel that crap out of the areas to be welded to keep from contaminating the welds...
We tacked the section to the frame, just to get a good idea of what it will look like. Once we have the position just right, we'll make some real mounts for it.
I think Tevan approves, its kinda hard to tell really, he has this look all day long here in the shop...
In the next few days, we will be modifying the swingarm and building a set pan... Stay tuned folks!


